
How to Make a Budget in Excel (Step by Step)
Build a budget in Excel from a blank sheet in about 20 minutes, with the exact formulas that add it up for you. Or skip ahead and grab our free template.


To make a budget in Excel, list your income at the top, add rows for your spending categories below it, and let a SUM formula total each section for you. Group those categories into needs, wants, and savings, then subtract your planned spending from your income to see what’s left. The whole thing takes about 20 minutes.
The first time I built one of these, I was a couple of years out of college, living back at my dad’s place and bartending. My income was all over the place, some weeks busy, some weeks dead, and I had only a vague sense of where the money went. So one slow night I dumped every expense into a spreadsheet. The thing that jumped out wasn’t rent or gas. It was subscriptions. I was quietly paying for a stack of them I’d basically forgotten about and hardly used.
Just from breaking it all out that first month, I found over $100 a month I could claw back with changes that barely stung, like making coffee at home instead of grabbing it on the way to a shift. The spreadsheet didn’t make me spend less. It made the leaks impossible to ignore. That’s the whole case for doing this in Excel. It does the math, never forgets a category, and costs you nothing: no subscription, no app reading your bank account, no data leaving your laptop. Here’s how to build one from a blank sheet, plus a shortcut if you’d rather not.
What you need before you start
Two things. First, Excel, or Google Sheets, which works the same way and is free. Second, your numbers: roughly what you bring home each month and what you typically spend. Don’t have exact figures yet? Estimate. You’ll fix them after the first real month, and the estimate is still better than flying blind.
How to make a budget in Excel, step by step
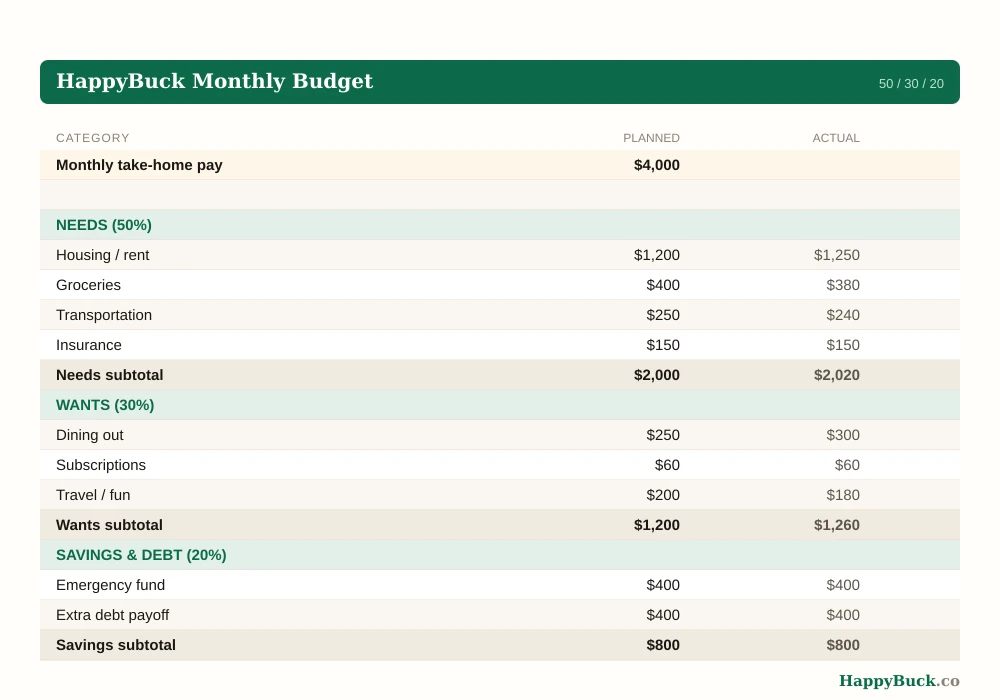
- Set up four columns. In row 1, label them Category, Planned, Actual, and Difference.
- Add your income. A couple of rows down, type “Monthly take-home pay” under Category and your number under Planned. Use what actually lands in your account, not your salary.
- Build three sections. Leave a blank row, then add section headers for Needs, Wants, and Savings & Debt. Under each, list your real categories: rent, groceries, dining out, emergency fund, and so on.
- Enter what you plan to spend. Put a planned amount next to each category. You’ll fill in the Actual column as the month goes.
- Add a subtotal row under each section. That’s where the formulas come in.
Here’s roughly what it looks like once it’s filled in:
The formulas that do the work
You need three, and Excel handles the rest.
- Add up a section. Click the subtotal cell and type
=SUM(B4:B8), swapping in the rows your section covers. That totals everything above it. Microsoft’s official SUM function guide covers the variations if you want them. - Find the difference. In the Difference column, type
=B4-C4to compare planned against actual for that row. Positive means you came in under. Negative means you went over. - See what’s left to budget. In a summary cell, subtract your total planned spending from your income:
=B3-(B13+B21+B28), using your three subtotal cells. When that number hits zero, every dollar has a job.
That’s the whole engine. Change a figure anywhere and the totals update instantly, which is the entire reason a spreadsheet beats a notebook.
How to turn it into a 50/30/20 budget
Want guardrails? The 50/30/20 rule is the easiest starting split: 50% of take-home pay to needs, 30% to wants, 20% to savings and debt. Add three cells that calculate your targets straight from your income:
=B3*0.5for needs=B3*0.3for wants=B3*0.2for savings and debt
Now compare each section’s subtotal to its target. If needs are running hot, you’ll see it the moment you type, and you can decide what gives.
Excel vs Google Sheets: does it matter?
Hardly. The formulas above are identical in both. Use Excel if you already have it or you’re offline a lot. Use Google Sheets if you want it free, auto-saved, and reachable from your phone. We’ll walk through the Sheets version in its own guide. Pick whichever one you’ll actually open.
Common mistakes (and the real limit)
A spreadsheet budget fails in a few predictable ways:
- Too many categories. Fifteen line items you’ll never track is worse than five you will. Start broad and add detail only if it earns its place.
- Skipping the Actual column. The plan is half the value. Filling in what you spent is where the learning happens. Block five minutes a week for it.
- Ignoring irregular bills. Car registration, the annual insurance premium, the holidays. Add a “sinking funds” row and set aside a little each month so they don’t blow up an otherwise good month.
And the real limit: a spreadsheet only works if you open it. If manual entry is the thing that makes you quit, a budgeting app that imports transactions automatically may be worth the subscription. There’s no prize for doing it the hard way.
A faster start: grab our free template
If you’d rather not build from a blank sheet, we made one you can copy. It already has the 50/30/20 sections, the subtotal formulas, and the planned-versus-actual columns wired up. Plug in your numbers and you’re budgeting in about five minutes.
Download the free HappyBuck budget template (.xlsx)
It opens in Excel, or in Google Sheets with one File > Import.
Dig deeper
- New to all this? Start with the full guide to budgeting for beginners.
- Build the emergency fund your budget is quietly funding.
- Carrying balances? Here’s how to pay down high-interest debt.
A budget in Excel isn’t fancy, and that’s exactly why it works. Set it up once, check in once a week, and let the formulas keep score. For official worksheets to compare against, the Consumer Financial Protection Bureau has free, no-hype versions too.


